引き続きVSTS拡張の紹介です。今回はGridを拡張してみたいと思います。
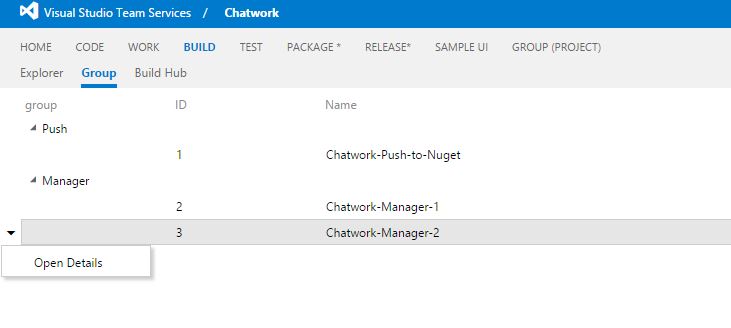
そもそも、VSTS SDKにはいくつかの組み込みUIコンポーネントが用意されています。その一つがGridで、最初のサンプルにも出したのですが、今日はコンテキストメニューとヒエラルキー表示(ツリー状表示)を試してみたいと思います。 使うデータは(2)で使ったビルド定義一覧です。そもそもビルド定義の表示は本家のページだと名前順固定でフラットに並ぶので使いづらい... なんとかグルーピングできないか?ということで試しました。
参考リンクはこちら
Use the Grid Control | Extensions for Visual Studio Team Services
最初に今回のサンプルコードを貼っておきます。
 VSS.require(["VSS/Controls", "VSS/Controls/Grids", "VSS/Controls/Menus",
            "VSS/Service", "TFS/Build/RestClient", "TFS/WorkItemTracking/RestClient"],
     function (Controls, Grids, Menus, VSS_Service, TFS_Build_WebApi, TFS_Wit_WebApi) {
        var webContext = VSS.getWebContext();
        var buildClient = VSS_Service.getCollectionClient(TFS_Build_WebApi.BuildHttpClient);
        var container = $("#grid-container");
        function menuItemClick(args) {
          var buildDefinition = args.get_commandArgument().item;
          switch (args.get_commandName()) {
            case "open":
              window.location.href = `${webContext.host.uri}/${webContext.project.name}/_build#_a=completed&definitionType=2&definitionId=${buildDefinition.id}`;
              break;
          }
        };

        function getContextMenuItems() {
          return [
            {
              id: "open",
              text: "Open Details"
          }];
        };
        var regex = /^[^-_]+[-_]+([^-_]+)([-_]+|$)/;
        buildClient.getDefinitions(webContext.project.name).then(function(buildDefinitions) {
            //正規表現によるグルーピング処理。要件に合わせてお好きなように
            var groups = new Map();
            buildDefinitions.forEach(function(b){
              var m = regex.exec(b.name);
              var n = m == null ? "" : m[1];
              var group = groups.get(n);
              if (group == null){
                group = [];
                groups.set(n, group);
              }
              group.push(b);
            });
            var output = []; //これが最終的に使うグルーピングしたデータソース。配列じゃないといけないので、Mapのままじゃだめっぽい
            groups.forEach(function(value, key, m){
              var item = {};
              item.groupName = key;
              item.children = value;
              output.push(item);
            });
            Controls.create(Grids.Grid, container, {
              height: "1000px", // Explicit height is required for a Grid control
              columns: [
                  { text: "group", index: "groupName", width: 100, indent: true }, // indent:true でこのカラムをキーにヒエラルキー表示
                  { text: "ID", index: "id", width: 50 },
                  { text: "Name", index: "name", width: 150 }
              ],
              source: new Grids.GridHierarchySource(output), // ヒエラルキーの場合はGridHierarchySourceオブジェクトで包む
              gutter: {
                contextMenu: true
              },
              contextMenu: {
                items: getContextMenuItems(),
                executeAction: menuItemClick,
                arguments: function(contextInfo)  {
                  return { item: contextInfo.item };
                }
              }
            });
        });

     VSS.notifyLoadSucceeded();
 });
コンテキストメニュー
コンテキストメニューを実装するには、コンテキストメニュー一覧を返す関数(サンプルではgetContextMenuItems)と、コンテキストメニューをクリックしたときに呼ばれる関数(サンプルではmenuItemClick)を用意しておきます。今回はOpen Detailsというメニューでクリックしたらそのビルド定義の過去のビルド一覧を表示するページに遷移するようにしました。なお、ビルド一覧を表示するURLは、APIの返り値では取得できないため、現在の挙動から想定されるパターンでURLを組み立てています。なので仕様変更による動かなくなる可能性はあります。あとは、Controls.createするときのcontextMenuオプションに指定すると動きます。
ヒエラルキー表示
ヒエラルキー表示をするには、まずデータソースとなるオブジェクトで親子関係を定義しておきます。そもそもデータソースとなるオブジェクトはJavaScriptの配列である必要があるのですが、配列の要素であるオブジェクトにchildrenプロパティを指定してそこに子供の要素を指定します。
[
  {
    name: "parent1",
    children: [{
      name: "child1-1"
    },{
      name: "child1-2"
    }]
  },{
    name: "parent2",
    children: [{
      name: "child2-1",
      children: [{
        name: "grandchild2-1-1"
    }]
  },{
    name: "parent3"
  }
]
今回はビルド定義一覧をグルーピングして表示するため、ビルド定義一覧をAPIで取得した後に加工しています。本当はグループとそこに属するビルド定義一覧を設定できるようにするのがいいのですが、とりあえず名前を正規表現で解析してグループ名とみなすことにしました。グループしたオブジェクトさえ作れば、あとはGrids.GridHierarchySourceオブジェクトに包んでsourceに指定し、ヒエラルキーのキーとなるカラムにindent: trueを指定するだけです。
実行するとこんな感じに表示されます。
